Windows Server VMs on GCP Compute Engine
Quick tips for creating and installing a windows server VM on GCP
The creation of the instance is straightforward - pick the instance name, the boot disk, any special networking (otherwise, it will go into your default VPC in your project).
The Instance Name
This is important as it will be used in several places - including in your DNS mapping - if you end up creating one for the server.
Boot Disk
The 'boot disk' is where you need to pick Windows Server 2022 (or whatever). Here you can also configure any snapshots you need of your boot disk.
Deletion Rule - You can either delete the boot disk on instance deletion or hang on to it - to be able to spin up a new VM with the same boot disk.
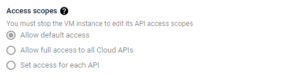
Service account for your Windows VM - what APIs can it call?
The VM you create will have the ability to call GCP apis. Which APIs it calls depends on the scope you provide to the ServiceAccount that it runs under. This is similar to windows service accounts, and is a key feature of GCP IAM. You can use the default compute engine service account here - or create your own custom one.
Networking
Pick the Firewall rules (e.g. - allow HTTP, HTTPS traffic - if your server will be consuming apis or hosting a web app)
Connecting to - RDP ing into the server
- To RDP into your server, find the Set Windows Password on the Instance details screen. This will let you pick a new username as well as set a generated password.
- Ensure that the username you pick is 'admin' . And use the generated password. RDP with this new admin user login details
Installing MSI packages on GCP Windows VMs
You are probably doing all this to install some packages (in my case it was the Service Now MID MSI package). Try and have a second disk attached - with 100 GB of space - for the installation to work. Otherwise your boot disk (with 50GB) is probably going to not let you install. It is better if you do this on VM creation - as doing this after will entail stopping the instance.
Attaching a D: disk from the Console
- The instance will need to be stopped. Add additional disk from the Instance Details (Edit Details).
- Restart the instance.
- The disk will not automatically show up as a drive (in windows explorer) - for that you need to turn it into a VOLUME.
- Go into server manager - local server - Disks - and you should see your new disk. Take the Create Volume option (it will prompt you for the drive letter) .
- Once the volume is created, you should see your drive show up in windows explorer.
- Delete Disk when instance is deleted ? - Do you need the installed software to run from another VM instance? If not, just ensure this disk gets deleted to avoid runaway 'rogue disk' charges.
Running an installer (MSI) from the command prompt
run the cmd prompt as administrator
msiexec /i setup.msi (whereever the msi file is)
Enable OS Info
Enable VM Manager to View OS Info - is a suite of tools that can view OS level info.
Summary
The Windows OS world and the GCP compute engine console are two different worlds. Spinning up a Windows VM from a GCP console - and configuring windows level information requires a little bit of digging. These are some quick tips.
Leave a Reply